Today I stumbled upon a post about an epoxy flooring DIY kit application project.
Bridget looks quite happy while coating her garage with Epoxy resin just by herself.
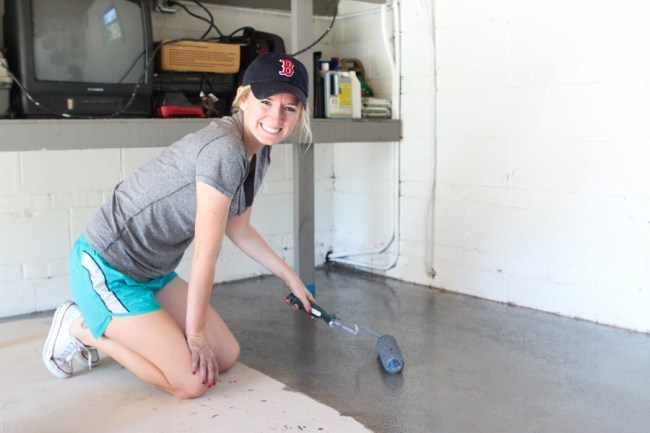
Credit: DIY playbook rookies.
So why should we consider hiring epoxy coating contractors to do the job for us?
The fact is that it requires a little bit of hard work and the self-realisation that it really isn’t as simple as some companies make it sound.
A quality epoxy floor coating requires certain steps be taken to ensure a long lasting floor.
Chances are you end up having an epic fail as Heather had:
Many of the DIY projects may go wrong because the installer is not aware of the issues with epoxy flooring. Bridget has made this point bold: “Follow the instructions carefully”
Heather didn’t, and she had that gigantic white spot in the middle of her dining room.
But there are cases that people do follow the instructions and still, they get terrible results.
I will briefly show you four possible situations that a DIY epoxy floor peels, even if the instructions are followed completely.
1. POOR SURFACE PREPARATION
A surface needs to be properly prepared in order for it to be able to bond mechanically with epoxy coating.
This means it should be clean, dry, dust-free, and the surface must be ground or shot-blasted before applying the primer.
What! Shot blasted! It was supposed to be a simple DIY project!
Grinding re-surface the concrete profile to some extent, and our DIY kit preparation acid does a poor job to make physical bonds feasible.
Shea from allgaragefloors.com blames the Epoxy-DIY-Go-Wrong at acid wash component and he is absolutely right. As he puts it:
“It is not really feasible to remove all those aged greases from the floor just by acid washing it. It takes hours of diamond grinding and vacuuming to reach a keyed surface.”
Allow me to explain that further.
Most epoxy paint kits will instruct the DIY user to just clean the floor or etch it with muriatic acid.
Cleaning by itself will make zero difference. No matter what type of degreaser you employ, it will have no impact on the concrete profile.
Acid etching, while a valid preparation method, will only work if the concrete’s pores are open enough to allow the acid to react and remove the thin cement paste on the very top.
The preparation made by acid etching is just skin deep. As a result, acid etching will not be enough for areas of the concrete which are sealed, oil stained, painted or contaminated.
The International Concrete Repair Institute (ICRI) has prepared a technical guideline #03732.
It describes the preparation level of concrete on a scale from CSP 0 to CSP 8, with CSP 0 being the initial stage before modifying the surface and CSP 8 an extreme shot blasting.
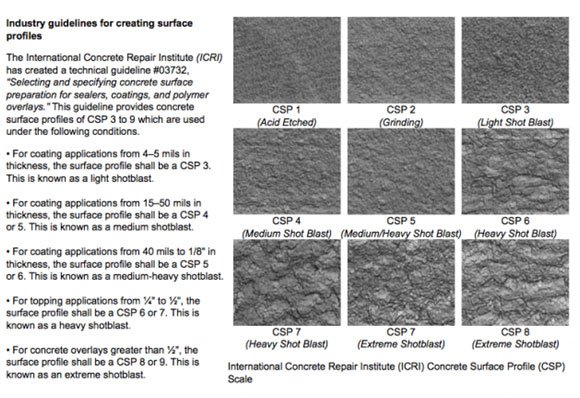
Most epoxy flooring requires a minimum preparation of profiles as CSP2 or grinding to achieve the proper mechanical bond.
To ensure a proper concrete surface profile (CSP 2 or 3), contractors normally utilize a shrouded concrete grinder.
On rare occasion, shot blasting the concrete might be the only way to go. This is the case for the contaminated concrete floors.
Even if the concrete is properly prepared, contaminants such as fatty acids (from cooking), silicone, siloxane and acrylics can soak in deep enough to still present an issue for proper coatings adhesion.
That is the reason that often, heavily contaminated concrete areas must be heavily shot blasted (CSP-4 or greater) or cut/replaced.
But back to our subject, it is needless to say how useless acid etching appears compared to all these other methods.
So, even if you do follow the instructions, there is still a good chance that your concrete profile remains mostly the same.
And that is one of the reasons your DIY project may peel off within a year or two, even if you follow the instructions CAREFULLY.
2. HUMIDITY
Epoxy doesn’t bond well with water. Presence of moisture and humidity can cause serious problems.
Moisture will change the course of chemical reaction that is going on in molecular level, and will not result in your desired durable garage epoxy floors.
But moisture may causes a more serious issue.
When too much moisture is trying to migrate upward through a concrete slab, it will put pressure on the coatings.
Once high enough, that pressure will force either the coatings of the concrete or the coatings will pull apart the near-wear-surface of the concrete.
These problems usually exist due to poor garage floor construction (no stone base under the concrete slab) or due to water migration issues (spouting and downspouts directing water under the garage floor).
On occasion, they may exist due to the improper grading of the landscaping around the garage.
This is to the extent that Epoxy manufacturers will not guarantee epoxy coating when surface exceeds a certain humidity level.
Surface moisture level is one of the items that every contractor will keep a record of while installing your epoxy coating. You want to do the same, for good reason.
So, make sure that the surface is completely dry.
If not sure, feel free to use a fan heater to dry it out completely and then check it after a while if there is any sign of moisture.
The other form of water that can cause a problem for flooring is humidity.
Excessive humidity during the coatings installation can affect the inter-coat adhesion that is the strength of the bond between layers of polymer coatings.
In general, polyurethane, polyurea and polyaspartic are more humidity sensitive than most epoxies and acrylics.
Too much humidity will cause delamination, cloudiness and improper curing.
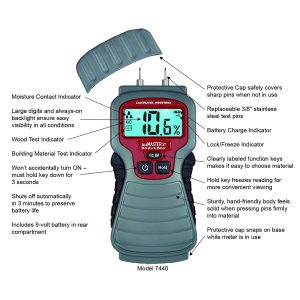
So you will need some extra gadgets that are not provided/advised in your DIY epoxy kit.
I advise the use of any known brand of Moisture Meter, especially the ones can penetrate into the surface. For instance, you can purchase “Calculated Industries 7440 AccuMASTER XT” Digital Moisture Meter from Amazon.
Here is the link if you want to purchase it.
Most importantly, there must be no rising humidity from beneath the ground. Please bear in mind that, epoxy resins are water-resistance; however, any humidity from below or sides, can penetrate and destroy them in time.
3. WEAK AND/OR INCOMPATIBLE SUBSTRATE
Chances are that you are doing a epoxy flooring for garage with an aged concrete.
The concrete slab is worn out and you have decided to apply a new shiny epoxy coating to rejuvenate your garage floor.
This presents a different kind of problem to all other previous ones.
The Epoxy resin will be much stronger than the substrate. So instead of epoxy detaching from the cement, the cement will be torn apart.
The picture below shows the catastrophic effect of applying epoxy resin on a weak substrate very clearly.
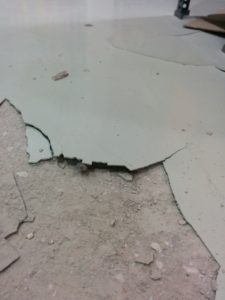
Credit for learncoatings.com
The other common example is applying epoxy resin on timber.
Make sure the substrate is compatible for epoxies both in terms of adhesion as well as tensile strength.
For instance, wood is far more flexible than epoxies which leads to the epoxy cracking simply because it cannot follow the expansions of the wood floor.
The solution that is often proposed for epoxy coating is to have a cement board on top of the wooden floor and then have all the joints filled.
Then only you can coat the cement sheet with epoxy resins.
If you feel like that’s not within the scope of a DIY floor coating, it is time to call a contractor who knows how to do it.
4. INSUFFICIENT WICKING / WET-OUT
Any type of coating should “wet-out” the substrate. Epoxies are no exceptions.
Properly prepared concrete should be completely wet by the epoxy resin – meaning the resin soaks into all the open pores and surface imperfections that are created by the prep process.
This is where professional coatings shine and DIY epoxy paints fail.
A good coating will have an adhesive strength that exceeds the concrete surface pull-strength.
Most kits fail here, as they are often just an epoxy fortified latex paint or have too many fillers.
This modification makes the epoxy easier to roll out and cheaper, but greatly decrease its bond strength.
The take away here is that even if you are doing the epoxy flooring by yourself, please keep in mind that buying from some professional supplier may work to your benefit in a long run.
5. CONCLUSION
Epoxy floors look glamorous, but one has to bear in mind that the installation process of these coatings is a pretty messy process.
It takes a lot of preparation for hard work, even if all other factors such as humidity and moisture level are within the limits.
There are also some substrates that you simply cannot apply the epoxies.
In this article, I omitted all of the other obvious parameters that epoxies fail to operate, whether a commercial grade or DIY samples, for instance: low or very high temperature.
Share in the comment section below if you know of any other reason that causes the DIY epoxy flooring to fail.
Thank you for your time and have a good one.
Thank you for explaining how the installation process for epoxy flooring can be a messy process. My sister wants to have her garage floor coated in epoxy, but I don’t think she knows exactly what that will entail. I will be sure to forward this article to her, so that she can know that she should leave it to a professional service to do.
Thanks Sandra. All the best.
It makes sense that too much humidity can prevent your polymer coatings from being properly applied. My uncle has recently purchased an old warehouse that he would like to turn into a storage facility, but he needs to find a way to keep the room dry enough to install polymer flooring. Maybe he should hire a professional that can help him properly install his desired flooring.
Epoxy coating is to be done only on vaccum dewatered concrete substrate, else moisture from the bottom will lift the bonding.
You have not explained about the primer. Is it amine adduct + epichlorodyhydrine. What is the thicksotrophy of this product and what is the grams per sq MTR coverage.
Surface preparation is best done by scarifying machine roller fitted with tungesten carbide tips, both rolling and vibrating. This is very fast.
Shot blasting/ steel grit blasting will leave rust spots on the surface. Alternatively can use aluminium oxide grit or Garnet. Acid wash will not remove soaked oil and wax etc.
Getting completely dry surface is practically impossible. Your primer should take care of this.
thanks guys, I was looking for this sort of guide for a long time now.
Found your post interesting to read. I can’t wait to see
your article. Good Luck for your upcoming update.This article is really very interesting and effective.
Best regards,
Demir Raahauge